

Aesthetics alone are enough reason to fix cracked tile. But it’s not just a matter of visual appeal. Repairing cracked tile protects your subsurface from moisture. When moisture gets beneath your tile—especially likely in bathrooms and kitchens—you could be well on your way to more expensive repairs. So, don’t wait around to fix any cracked tiles. If you don’t deal with the problem now, you may have more complex issues to deal with down the road, in the way of a rotten subsurface. From repairing minor cracks to more substantial damage that requires removing and replacing individual tiles, we’ll run down everything you need to know about how to fix cracked tile.
Epoxy for Minor Cracks
Minor cracks can turn into bigger cracks, so, when you spot a hairline fissure in your tile, you should act. For cracks of this nature, clear epoxy is probably your best bet. It’s an easy enough process that can save you headaches down the road.
Get the Job Done with Our Tiling Tools
Before you apply your epoxy, you need to fully clean the crack. Wipe it down with a cloth and warm water, and then dry it completely. It’s also good to use a vacuum, so you can be sure to extract all the particles from the crack. Then you simply apply the epoxy, using a toothpick or a craft/ popsicle stick, depending on the size of the crack. Be sure to fill the crack and remove any excess.
For truly hairline cracks, you may choose to call it a day and be done with it. But if the epoxy work stands out like a sore thumb, you can attempt to hide it with a high-gloss paint that matches your tile color. Wait until your epoxy is fully dry, and then apply the paint using a crafting brush. You should give it at least two coats. Once the paint is fully dry—give it at least a day—you’ll seal the paint with a clear urethane sealer.
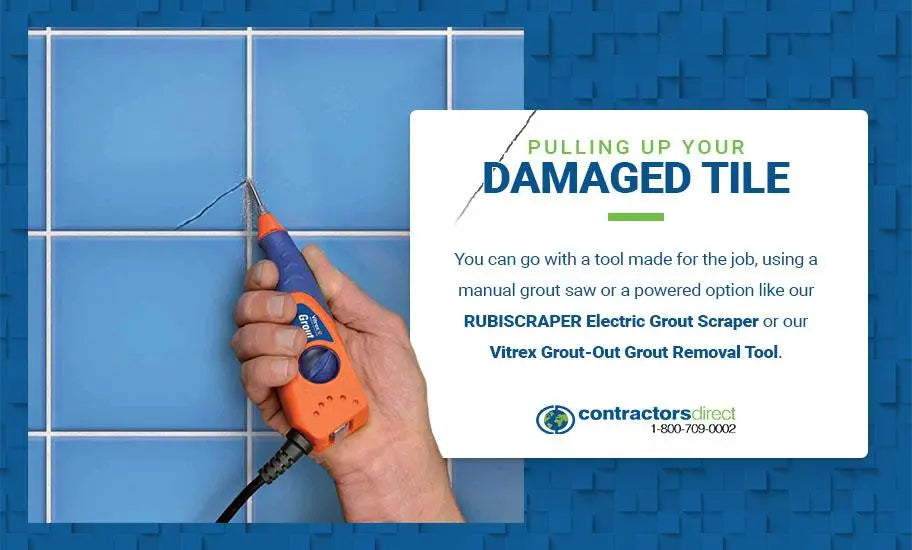
Pulling Up Your Damaged Tile
When a piece of tile is truly beyond repair—you know it when you see it—that doesn’t mean the entire surface is wrecked. Nope! You can remove the tile or tiles in question and replace them with new pieces. We’re here to walk you through it!
First of all, you need to take up the broken piece(s). To do that, start with the grout. Old grout may be soft and not put up much of a fight. It’s possible you’ll be able to whittle away at it with your utility blade. You can also go with a tool made for the job, using a manual grout saw or a powered option like our RUBISCRAPER Electric Grout Scraper.
With the grout removed or at least compromised, it’s time to get that broken tile up. If you can, try working a chisel into the tile break and gently tap it with a hammer. It’s likely that the cracks in the tile will extend throughout the piece. If that happens, carefully use your chisel to pry the tile from the subsurface.
If you can’t get a chisel into the tile break or if this method isn’t working: DO NOT force it, as you don’t want to damage adjacent tile. You may need to carefully break up the tile with a hammer. Simply tap the surface of the broken tile until it’s broken up into smaller pieces that you can remove. It’s critical that you don’t use more force than is necessary.
Whether you’re able to pry the piece up or you have to break it up with a hammer, it’s time for your next step: removing every bit of the old tile. You’ll also want to get rid of as much of the original mortar as you can. You may need to chip away with your chisel and hammer. Again, be mindful not to cause further damage to neighboring tiles. And be sure not to damage the subsurface while you’re removing the adhesive. Once the original tile and adhesive are cleared, quickly vacuum to remove lingering small pieces and dust.
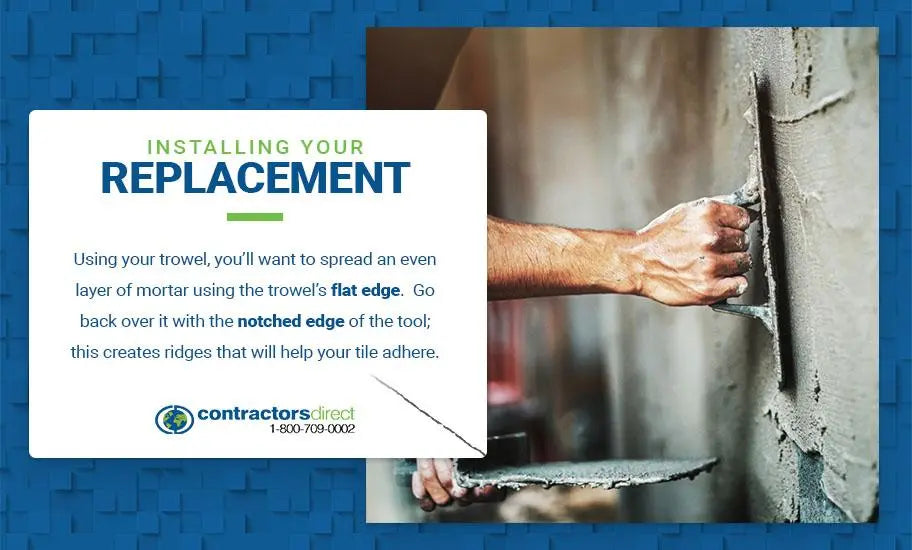
Installing Your Replacement
Now it’s time to prepare your mortar. This is an easy enough process. You’ll want to adhere to the specific manufacturer recommendations, which you’ll find on the product package. With your mortar set, it’s time to apply it to the newly bare subsurface. Using your trowel, you’ll want to spread an even layer of mortar using the trowel’s flat edge. Go back over it with the notched edge of the tool; this creates ridges that will help your tile adhere to the subsurface.
For your next move, it’s time to place the new tile onto the adhesive. Hopefully, you’re using leftover tile from the original install. If that option isn’t available, try your best to find an exact tile match.
Ease the new tile into the slot, rocking it back and forth a bit to ensure it really gets into the adhesive. Line it up with neighboring tile and also check that it’s level, as you don’t want your new tile creating a ridge to trip over and stub your toe on. Once the new tile is set in place, wipe away any excess mortar with a moist sponge. Then you need to give your mortar plenty of time to dry. Depending on your adhesive, this can take as long as a full 24-hours.
With the adhesive fully dry, it’s time for your grout. Readying your grout is also a straightforward process. Like you did with the mortar, simply follow the product instructions. Some grout comes mixed and ready for use.
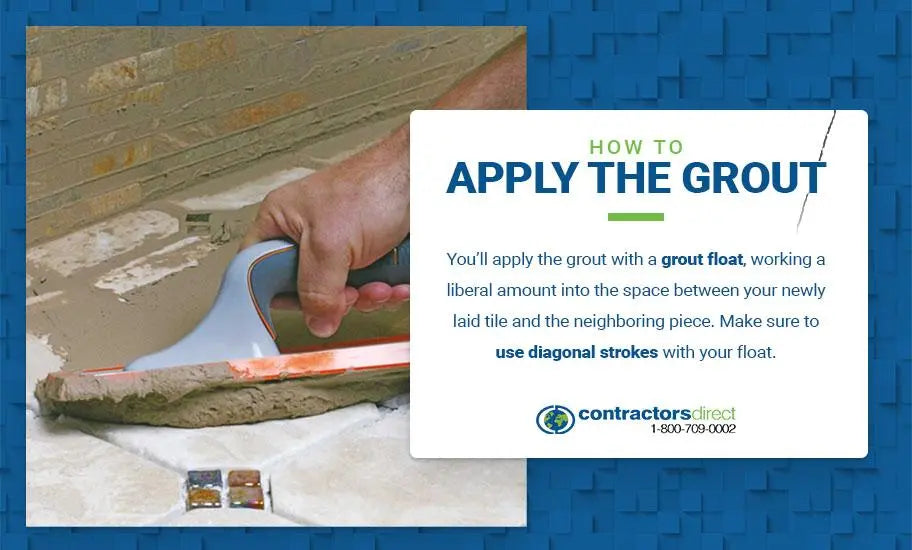
You’ll apply the grout with a grout float, working a liberal amount into the space between your newly laid tile and the neighboring piece. Use diagonal strokes with your float. Once the gaps are filled, you’ll once again use your moist sponge to wipe up all the excess grout. You may need to wipe multiple times, rinsing your sponge as you go. The grout may take an additional 24 hours to fully dry, so, if this is a floor tile, keep foot traffic away from the piece.
Crack Prevention
Of course, the best way to deal with damaged tile is to simply avoid cracks in the first place. Properly installing tile by back buttering the tile with thinset and having a level floor is very important and is less likely to crack, though even the best-laid tile isn’t going to hold up very well if something heavy is dropped on it. But there are some key points to keep in mind when you’re installing tile. First of all, it’s essential that you’re laying tile on an even surface. If your subfloor isn’t solid, you can strengthen it with fresh plywood. If the original subfloor has gotten moist—especially common in older bathrooms—you’ll certainly want to reinforce it before laying your tile.
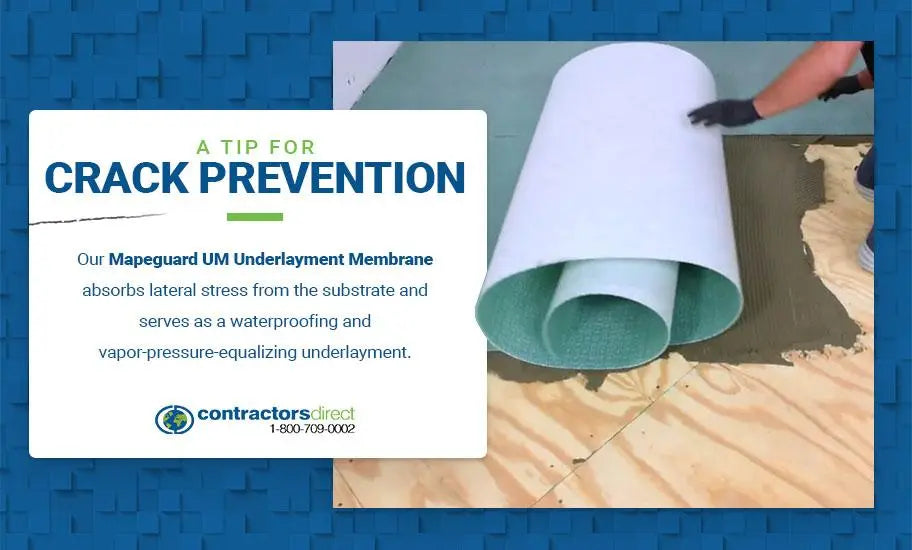
Underlayment membranes between your tile and the subfloor go a long way toward protecting your tile should your subfloor resettle or shift. Our Mapeguard UM Underlayment Membrane absorbs lateral stress from the substrate and serves as a waterproofing and vapor-pressure-equalizing underlayment. If your tiles aren’t thoroughly bonded with grout, you’re all but inviting moisture to penetrate. Moisture leads to cracks, so be sure to mix your grout properly and use an adequate amount. Grout and tile sealants can also add an additional layer of moisture protection.
There you have it. This rundown should have you ready to tackle your cracked tile. With a little knowhow, it’s not that difficult. And, keep it mind, it isn’t just a matter of appearances. Cracked tile allows moisture to penetrate, which can lead to more extensive and costlier repairs. So now that you know what to do, get after it.
Contact Contractors Direct for All Your Tiling Needs
If you have questions about tile or need to know what tile tools you need for the job at hand, we’re here for you! Reach out to us at 1-800-709-0002.
Image Credits:
jayk67/Shutterstock.com
AK_Vector/Shutterstock.com
lovelyday12/Shutterstock.com